Feeds:
Posts
Comments

The more things change, the more they stay the same.  I broke another part.

My wife is taking joy in watching me stare at my heli, trying to figure out how the hell I will fix every time I break something.  Of course, she doesn’t know anything about money so she has no idea how much I have already spent in the last few weeks (she would not take joy in that).

So far I have broken two push-rods, the paddle control frame, and bent the flybar (it looks like a damn DNA helix at this point).  Did I mention that I am still learning to hover?

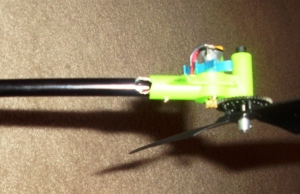
This time, the tail fin.

The crazy thing is that I broke it and didn’t realize it until the next time I went to fly.  What’s more, I didn’t even realize it the next time until I crashed.  After my five-year-old daughter and I searched the field for the broken part, I gave up and went back home – where I found the broken part laying on the ground.

It would be one thing to have a weak tail fin.  It is a completely different thing to have a weak tail fin that is a bitch to replace.  I do not want to replace this thing one time, let alone every time that I land too hard.

My fix?

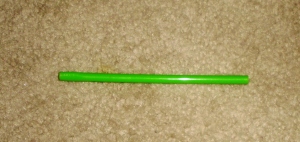
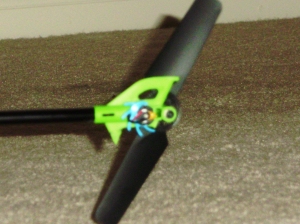
Look at that color.  Perfection; and a completely random find.  My daughter can’t seem to drink anything without a straw (is my kid the only one with this weird straw obsession?).  I open the drawer, and there staring back at me is this thick plastic straw that happens to be the exact same color as my heli.

Eureka!

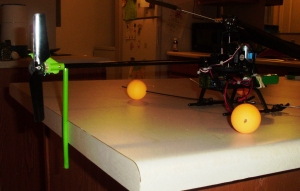
When I saw this. a plan was immediately formed into my head:  A vertical rod attached to the tail boom that won’t break and will keep the tail rotor from hitting the ground.

I am no engineer, and I didn’t even sleep at a Holiday Inn Express last night, but I do think I have a brilliant plan here.  The new tail fin (which isn’t really a fin, so let’s call it a tail rod….that sounds erotic….tail fin it is)…anyway, the new tail fin is strong enough to take a hard hit -stronger than the original tail fin.  The new fin is also not going to snap in half, no matter how hard you hit something.  And the way it is assembled, the worst thing that could happen is that it could fall out on a severe landing.

How did I do it?

The first thing I did was cut what was left of the bottom half of the stock tail fin off (the top half will stay to hold the rotor and motor).  Next, I took the smallest drill bit that I had (3/32) to drill a small guide hole in the bottom of the tail boom as close to the tail fin as possible.  After the guide hole was drilled, I continued to step it out until I had a hole almost big enough to insert the new tail fin.  The hardest part, after actually getting the guide hole drilled into the round tail boom, is not drilling into the wires going to the tail motor.

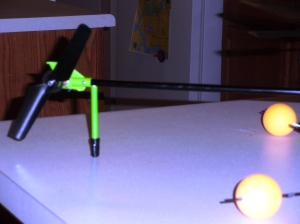
The hole is drilled just smaller than the plastic tube; this is how it is held in place.  No glue, no screws, just force.  If it comes out, I can stick it back in.

After I inserted the tube, I put the heli on my bar so I could see how much I need to chop off to make it level.

I cut off the excess, added a little electrical tape to the bottom so the plastic that I just cut would not catch the ground, and voila! A new tail fin.

It may not be the most beautiful thing in the world, but it matches the bird, and it sure as hell should keep me from having to replace my stock tail fin every other week.  Maybe, when I get to the point where I can land without breaking something, I may replace it with a stock tail fin….probably not.

And I have push-rods in the mail.  w00t!

SpaCityFlyer
Flying Again!

After stalking the mail man for the last few days, my parts have arrived.  I ordered the parts from USHobbySupply and had it delivered “Priority through the USPS.  The parts were int he mail the day after I ordered them and it only took a few business days for them to arrive.  I was very happy with my experience using USHobbySupply.

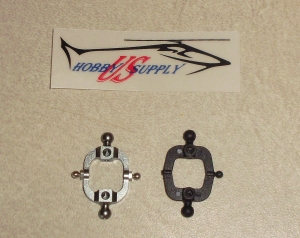
After breaking my paddle control frame (PCF), I decided to order a stronger replacement.  The stock PCF is made of plastic and broke like a twig.  The replacement is made of metal and will not easily be destroyed.

Here is the old, broken PCF (black) and the new, stronger PCF (silver):

Old & New PCF

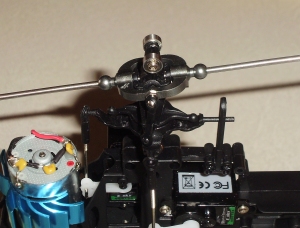
Here is the new PCF after installed onto the Honey Bee:

After immediately installing the new PCF, I took this baby for a ride.  I still suck, and I am still learning to hover, but getting the opportunity to put this outside makes a world of difference.  After flying around in my little apartment, flying outside seems so much easier.  I still have very little control, but I can keep it in the air longer.

I still have tape holding on my broken ring-like push-rods and my flybar is quite bent, for now I fly with what I have, but to steal and twist a quote from former Secretary of Defense, Donald Rumsfeld:

I go to flight with the heli I have, not the heli I might want.

SpaCityFlyer

The Waiting Game.

Tom Petty said, “The waiting is the hardest part.”  Ralph Waldo Emerson once asked, “How much human life is wasted in waiting.”  Dr. Robert Anthony stated, “Waiting is a trap.  There will always be reasons to wait.”

Here, I sit and wait.

Why do I wait?  Because I need parts.  I got cocky and tried to fly my Honey Bee outside with a stiff wind.  I wrecked.  I broke my paddle control frame (PFC).

Why do I not have parts?  Because finding parts for the Honey Bee V2 is like finding weapons of mass destruction in Saddam Hussein’s Iraq: Near impossible.

Don’t get me wrong, I can find every part that I need…if I am willing to pay an extra $20 (or more) in shipping and handling per part.  It seems that every online store has one or two parts that I need and the rest are sold out.  This is a real pain in my ass.

Another issue is that many of the online stores are based in Hong Kong and China.  I have never bought anything online from Asia, and I am a very apprehensive to start now.  Plus, the shipping charges are outrageous.

I checked HeliDirect (where I bought the helicopter).  They had one part, but everything else was sold out.  I have been on a wait list for a week, but I still haven’t heard anything.

I googled  “rc heli parts,” “honey bee parts,” and anything else that would produce possible links.

I searched on Helifreak, a very good internet forum with a ton of fellow rc helicopter enthusiasts.  I found a lot of possible sites, but still no dice.

I finally decided that some parts are better than no parts.  To be fully satisfied, I need ringlike push-rods, flybars, a PFC, a trainer kit, and anything else that looks like it could break, but getting the bird back in the air is worth the money to just get what I absolutely need rather than what I would like to have. Although the push-rods are both broken, I do have them patched with tape and they are temporarily working so I don’t absolutely have to have the push-rods yet.

Fortunately, I stumbled onto an internet supplier called USHobbySupply.  I not only found a PFC, but I found an Xtreme metal PFC for around $12 and got a trainer kit from the same supplier.  It is an American supplier, so the shipping was not killer.  I actually got it sent Priority for much less than what it would cost for a slow delivery from Asia.  It should arrive in a few days and I will compare the stock plastic PFC with the new metal one when it arrives.

Until then, I wait.

SpaCityFlyer

As I have said earlier, the Esky Honey Bee V2 is very cheap to fix.  The problem with things that are cheap is that a lot of people buy them.  I now have two broken push rods that costs less than one dollar to fix but I cannot find a place online that has them in stock.  So I can either put the heli in the closet and wait or I can fix it myself.  I am not putting this thing in the closet!

I decided that a little tape and a few rubber bands would get my broken push rods to stay in place for now and it works fine (but it is not a permanent fix by any means).

Here is the video:

Hold your applause.

SpaCityFlyer

First Flight!

A battery is only expected to last 10-15 minutes in flight, but when you can’t really get off the ground the battery lasts longer than that.  By “can’t really get off the ground,” I mean IT IS HARD TO FLY ONE OF THESE THINGS!  Just getting the blades spinning and keeping the tail stable is an accomplishment.  Some say that flying a helicopter is like balancing a ping-pong ball on top of a beach ball.  I agree.

Luckily, there are online flight schools that help beginners without local mentors.  The one that everyone I have talked to seems to suggest (and the one that I follow) is RADD’s School of Rotary Flight.

http://www.dream-models.com/eco/index.html

Today is my third day to hone my skills on the heli.  To get the thing int he air seems almost impossible, but I did get a few seconds of sweet flight time.

More to come.

SpaCityFlyer

I have always been up for a challenge, and I have definitely found one that is going to take some time: Flying an RC Helicopter.

This is not only very challenging and fun, it is also relatively cheap on the startup.  Of course, there are people flying helicopter that cost thousands of dollars, but that is not the norm.  For between $100 and $200 you can be flying.

This blog is for me (and anyone who wants to keep up) to track my progress in this new hobby.  I hope to be able to drop a few nuggets of wisdom for any new flyers out there and if any old flyers would like to drop some wisdom on me, I will take it.

Here we go.

SpaCityFlyer